Go Plugins
Build an example plugin
Octant ships with an example plugin.
Install the plugin using:
Alternatively, build the go binary using go build then move the binary to the install path described below.
Installation
'go run build.go install-test-plugin' installs the plugin by creating a $HOME/.config/octant/plugin/ directory then building the binary to that location.
Run plugins from additional paths by setting paths to the OCTANT_PLUGIN_PATH environment variable when running Octant.
Octant will also respect XDG_CONFIG_HOME on Unix and LocalAppData on Windows for default plugin paths.
Uninstall
Plugins can be removed by deleting the plugin binary from ~/.config/octant/plugins. An example of deleting a plugin is shown below
where octant-sample-plugin is the plugin that will be uninstalled:
After deleting the plugin binary and restarting Octant, you should no longer see the plugin available as part of Octant.
Logs
Octant use go-plugin library, this library allows "Any plugins that use the log standard library will have log data automatically sent to the host process." by default with granularity level INFO, to set the log's granularity Octant provides a LoggerHelper that can be use this way.
The default granularity level is INFO and can be change to DEBUG by adding the option -v or by setting the OCTANT_VERBOSE environment variable to true
Log levels
- Info: Will be display by default, information about steady state operations.
- Warn: Will be display by default, information about rare but handled events.
- Error: Will be display by default and and will show the stack trace, information about unrecoverable events.
- Debug: Not shown by default, information for programmer low level analysis
References
Writing Plugins
When you want to extend Octant to do something that is not part of the core functionality you will need to write a plugin. Writing an Octant plugin consists of three main parts: defining the capabilities, creating handlers, and registering and serving the plugin.
Capabilities
Using plugin.Capabilities you can define your desired list of capabilities using GVKs. Octant provides a set of well defined capabilities for plugins. These capabilities directly map to Octant renderers and allow your plugin to inject its own components in to the view.
When plugin.Metadata.IsModule to true plugins can provide content and navigation entries.
The above defines a non-module plugin that will generate a new tab for Pod objects.
Handlers
Using service.HandlerFuncs you will assign handler functions for each of the capabilities for your plugin.
Handling Actions
In Octant you can create custom action handlers that you can trigger from button actions in the UI. There are also built-in actions which are triggered from internal Octant events, those are defined in octant/pkg/action/actions.go.
Here is an example of setting up your plugin to know when the current namespace has changed.
Besides having custom actions, there are pre-existing octant actions which are registered by octant internal modules and they can be leveraged to perform an action.
For example: action.octant.dev/apply (https://github.com/vmware-tanzu/octant/blob/master/pkg/action/actions.go) can be used to apply a yaml configuration for a resource.
Example Payload:
Register and Serve
Registering and serving your plugin is the final step to get your plugin communicating with Octant. This is also where you will pass in the name and description for the plugin.
Plugins with partial octant state
All plugin implementations are passed a request parameter which makes a partial octant state available to the plugins. request.ClientState contains accessors for the current namespace, filters and context name. The plugins can now respond to state updates by either responding to specific actions (eg. action.octant.dev/setNamespace) or they can reflect the current state using the request.ClientState.
More About Capabilities
Octant provides a well defined set of capabilities for plugins to implement. These include:
- Print support: printing config, status, and items to the overview summary for an object.
- Tab support: creating a new tab in the overview for an object.
- Object status: adding object status to a given object.
- Actions: defining custom actions that route to the plugin.
For plugins that as configured as modules the capabilities also include:
- Navigation support; adding entries to the navigation section.
- Content support; creating content to display on a given path.
A PrintResponse consists of a Config, Status, and Items. The Content can be any of the various components found in reference.
Tab
Adding a new tab via a plugin requires a new flexlayout then Tab component. The Name is used in the URL query param, and Contents defines the tab name within Octant.
Object Status
An ObjectStatusResponse has an ObjectStatus which contains a list of Properties, Details, and a Status (ok, warning, error). Details can be any of the various components found in reference.
A resource viewer shows the property labels and their respective components inside a table. Details can be seen in datagrid tables by clicking the icon.
Actions
Navigation
Plugins configured as modules can supply navigation entries. These navigation entries will be displayed with the application's navigation.
Content
Plugins configured as modules can serve content. The content consists of Octant components wrapped in a ContentResponse.
The function will receive the currently requested content path and can display content based on that path.
Module Path
Currently Octant creates a non-configurable base path for your plugin that is derived from the name of the plugin.
You can create nested paths that route to your module using that base path. Plugins should handle nested paths in the Content function and dispatch the responses accordingly.
Define Capability
Each plugin must have a defined name, description, and capability.
Plugins can provide a PrintResponse containing capabilities enabled by a provided GVK.
Config
A plugin with support for PrinterConfig appends a view component to the Configuration table of the supported GVK(s).
The header is added to the column on the left. Content is a component that is added to the right.
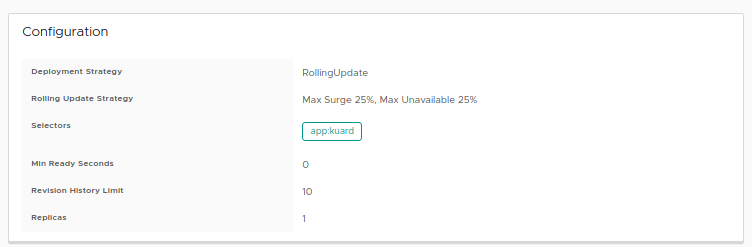
Certain GVK such as Deployments have a Configuration but not Status.
Status
A plugin with support for PrinterStatus appends a view component to the Status table of the supported GVK(s).

This pod has both a Configuration and Status.
Items
A plugin with support for PrinterItems allow adding a FlexLayoutItem consisting of a width and a view component.
Custom Runtime
Custom object store
For runtimes with custom object store implementations, Go plugins can pass arbitrary key/values when issuing calls to the object store.
A plugin can set a grpc header with prefix x-octant- which will be consumed by the grpc server to set up random properties for the object store context.
For example: To set a property named foo on the object store context, a plugin can set a grpc header named x-octant-foo.
Custom Icon
Custom Icon for plugins
It's possible to add a custom SVG for plugins.
First to do is define your SVG:
Then, where you are defining your navigation, add the SVG and set a custom name for it:
Note: It's possible to have a naming collision with Clarity icons, it's recommended to use non-common names for the svg